Introduction
PrestaShop is a free shopping cart platform that helps small to large businesses create and run a successful online store. It is 100% free. No monthly fees. No commissions on your sales.
PrestaShop is available under the Open Software License and was officially launched in August 2007. The software, which is written in PHP and based on the Smarty template engine, is currently used by 165,000 shops worldwide. MySQL is the default database engine. PrestaShop is the winner of the 2010 and 2011 best Open-source Business Application awards. According to W3Techs, PrestaShop is used by 0.5% of all websites.
Getting Started
PrestaShop is a web application: It needs to be installed on a web server in order to run, and it needs a domain name that your visitors will use to access your store.
Registering a domain name
Before downloading or installing anything, you need to provide a home for your PrestaShop online store. That is made of two components: a domain name, and a web server. A domain is the online identifier for your website, such as example.com or myonlineshop.net. It is the public face of your web server as well as your store.
You need to buy a domain name for your store. You might be able to get one at the same time as you get your web hosting in place: many web hosts offer a free domain with every new account. They might be free for a year, or as long as you are a client of that web host. This makes it easy to get the full package (hosting+domain name) in a go.
If you would rather get your domain name from an independent registrar, here are some that you can trust:
- Gandi: http://en.gandi.net/
- Namecheap: http://www.namecheap.com/
- PairNIC: https://www.pairnic.com/
There are many more. Ask your friends or Search about it on the web!
Finding a host
Now that you have a domain name, you need to have it lead to PrestaShop. This means that the PrestaShop files need to reside on a web server. You might have a web server of your own, but it is more likely that you have or will have your store hosted by an Internet hosting service (see: http://en.wikipedia.org/wiki/Internet_hosting_service), which provides you with an online home for a monthly or yearly fee.
Before starting an online store, you need to select a hosting provider. Just about every webhost can effectively handle the PrestaShop solution. However, only a few Hosting providers offer optimized servers for PrestaShop:
- OVH in France: OVH
- 1&1 in Spain: 1&1
- InMotion Hosting in all countries, except France and Spain: InMotion
When choosing your host, remember one crucial requirement: it must provide you with support for PHP 5.2 (or more recent), the programming language with which PrestaShop is written, and MySQL 5 (or more recent), the database system where PrestaShop stores all its data. There are many other requirements, for that just check the “Technical requirements” section below.
Technical requirements
PrestaShop is an application which runs on a web server, and is written using the PHP programming language. It stores its data in a MySQL server.
PHP is an open-source programming language, mainly used for web applications. Created in 1995, it has become the most used programming language by web developers. It uses a C-like syntax, making it easy for developers to learn it.
MySQL is an open-source database management system. Designed in 1995, it has since then become the most used database system by web developers. It is based on the SQL language, the most widely used database language.
Whichever hosting service you choose, it must have the following components installed on your web server:
- System, Unix, Linux or Windows. Unix is highly recommended.
- Web server, Apache Web server 1.3 or later.
- PHP 5.2 or later. You may have to activate PHP 5 (ask your hosting provider).
- MySQL 5.0 or later.
- At least 64 Mb of RAM on your server.
PrestaShop can also work with Microsoft’s IIS Web server 6.0 or later, and nginx 1.0 or later.
Tools
You need two tools: a text editor, for editing text files and a FTP client, fortransferring files from machine to your server and vice-versa.
Text editor
Here are a few well-known text editors:
- Windows:
Notepad++: http://notepad-plus-plus.org/
UltraEdit: http://www.ultraedit.com/
Crimson Editor: http://www.crimsoneditor.com/
- OS X:
Textmate: http://macromates.com/
Coda: http://www.panic.com/coda/
Smultron: http://www.peterborgapps.com/smultron/
- Unix/Linux:
Vim: http://www.vim.org/
Emacs: http://www.gnu.org/software/emacs/
FTP client
FTP is an abbreviation for “File Transfer Protocol”, meaning the standard way used to transfer files from a computer to a web-host.
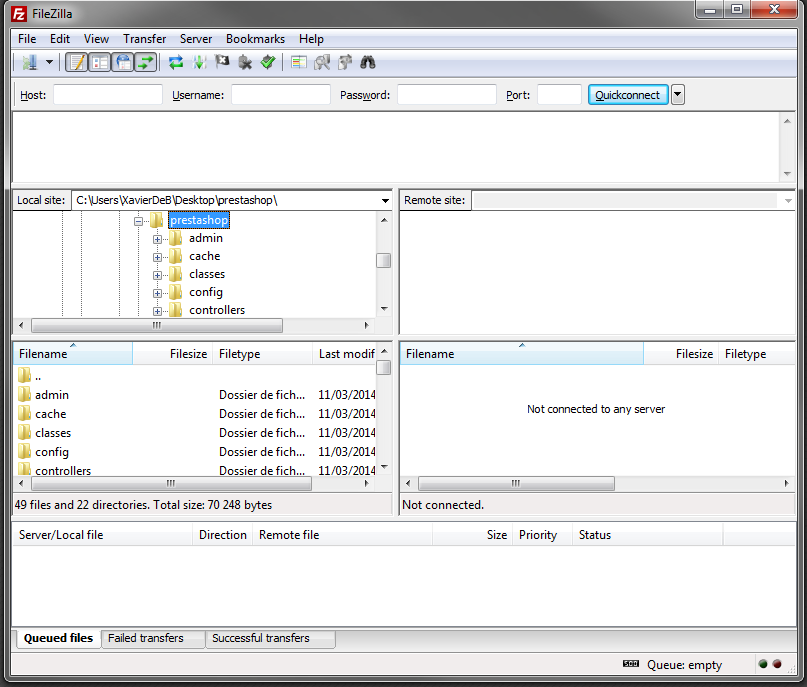
In this tutorial, we will use Filezilla, which is a great and free FTP client for Windows, Mac OS X and Linux. Download it from http://filezilla-project.org/ and start its installation.Note: Do not download FileZilla Server, only FileZilla Client!
Once FileZilla is installed, you will have to configure it with the connection parameters for your web server, which should have been sent to you by your host. If not, ask for them to your host – or check your spam folder.
Basically, the needed parameters are:
A hostname or an IP address, the location of your hosting space’s FTP server.
A username, your hosting account identifier, which is unique to you.
A password, obligatory security measure.
Open FileZilla, and open its Site Manager tool. You can do this in three different ways:
- Press Ctrl-S,
- Click the “Open the Site Manager” icon, at the top left,
- Open the “File” menu, and select the “Site Manager…” option.
A window opens.
To add your hosting space to the Site Manager:
- Click the “New Site” button. A new entry is created in the site list. Give it a recognizable name.
- On the right side, in the “General” tab, enter the parameters your host provided you with: host, user, and password. You don’t need to change the other default parameters, unless told by your host.
- Once all the fields are properly filled, click the “Connect” button. This will save your site in the list as well as log you into your account, so that you can make sure everything works right.
If FileZilla does not suit you, here are a few other well-known FTP clients:
- Windows:
CoreFTP: http://www.coreftp.com/
WinSCP: http://winscp.net/
SmartFTP: http://www.smartftp.com/
- Mac OS X:
Cyberduck: http://cyberduck.ch/
Transmit: http://www.panic.com/transmit/
Fetch: http://fetchsoftworks.com/fetch/
- Unix/Linux:
gFTP: http://gftp.seul.org/
kasablanca: http://kasablanca.berlios.de/
NcFTP: http://www.ncftp.com/ncftp/
Installing PrestaShop
PrestaShop is very easy to install. Once all the files are on your web server, you will be able to configure your shop in not less than 5 minutes in most cases: the installation process is very simple, as the installer takes care of everything for you. Less experienced users might need between 10 and 20 minutes to complete the whole process.
Before you get started, make sure you have all the requirements available: server space at a hosting provider, domain name, FTP client, text editor.
Detailed instructions:
Downloading and unzipping the PrestaShop archive
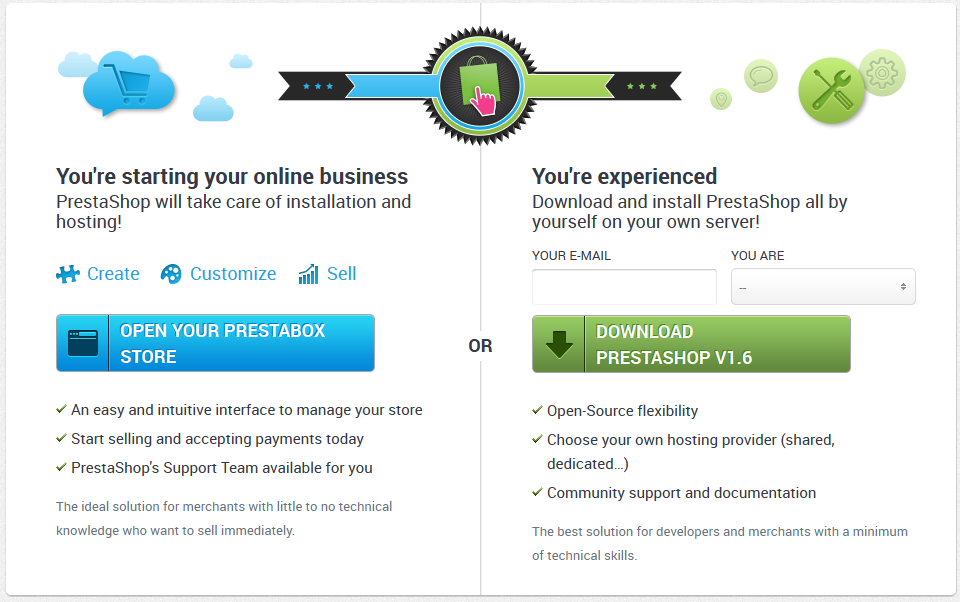
– You can download the latest version of PrestaShop at http://www.prestashop.com/en/download.
- Click on the “Download” button, and save the archive on your computer (such as on your Desktop). You should get a file named “prestashop_1.6.0.4.zip” (or an equivalent, depending on the version numbers).
- The downloaded file is a Zip archive, meaning one file containing all of PrestaShop’s files in compressed form. In order to continue with the process, you must uncompress the archive.
- Using a Zip tool, extract the content of the archive to a known location on your hard-drive (such as on the Desktop again). Do not upload the Zip file directly to your web server.
- The Zip archive has two items at its root :
- The “prestashop” folder, which contains all the PrestaShop files that you will soon be uploading on your web server.
- The “Install_PrestaShop.html” file, which opens this very page in your default browser.
The “Install_PrestaShop.html” must not be uploaded on your web server.
Uploading PrestaShop
You should now have a hosting space at your disposal (if not, read the “Getting Started” chapter of this tutorial), and a folder on your hard-drive with the uncompressed PrestaShop archive.
This step makes you upload the PrestaShop files on your hosting space. This is done by connecting your computer to your server using a tool known as a “FTP client”, which you should have installed while reading the “Getting Started” chapter. We will be using the free FileZilla (http://filezilla-project.org/).
Connect to your hosting space using your FTP client, by using the connection details provided by your web host (if not, contact your host). Once connected, it is time to transfer the PrestaShop files from your computer to your server.
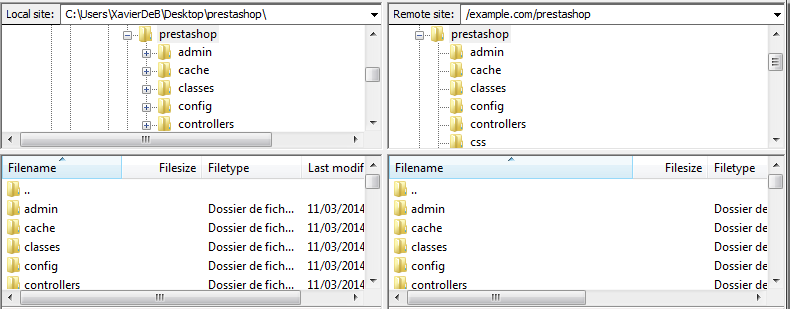
In FileZilla (or any other FTP client), browse your local folders until you find the one that contains the PrestaShop files. Keep it open in the “Local site” section on the left.
In the “Remote site” section (on the right), browse to the location where you want PrestaShop to be publicly available (root of the domain, sub-folder, sub-domain…). This can change a lot, depending on both your host and your needs:
Your Host:
Some hosts may require you to place your files in a specific folder, such as /htdocs, /public_html, /web, /www, /yourdomainname.com, etc.Other hosts’ FTP server will simply log you directly into the proper upload space.
Your Needs:
- If you want your shop to be the main website for your domain name (i.e., http://www.example.com), upload PrestaShop at the root folder of the upload space (which may depend on the host).
- If you want your shop to be in a sub-folder of your domain name (http://www.example.com/shop), you must first create said folder through FileZilla (right-click and choose “Create directory”), then upload PrestaShop in that folder.
- If you want your shop to be in a sub-domain of your domain name (http://shop.example.com), you must first create said sub-domain. This depends on your host: you might be able to do it simply by adding a new folder with your FTP client, or you might have to create the sub-domain through your host’s administration panel. Read your host’s support documentation first. Once created, browse to the sub-domain’s folder, and upload PrestaShop there.
On FileZilla’s left side, you should now have the local folder where you keep the PrestaShop files from the Zip archive, and on the right side, the destination location. If you haven’t done it yet, uploading is simple: select all files and folders from the local folder (use Ctrl-A), and either drag & drop them to the remote folder, or right-click on the selection and choose “Upload” in the context menu.
Uploading can take several minutes, as PrestaShop uses more than 7500 files and almost 1000 folders. After a while, all of PrestaShop’s files and folders should be online. Great!
Creating a database for your shop
Before you can actually install PrestaShop, you need to make sure your MySQL server has a database ready for PrestaShop’s data. If not, you must create one.
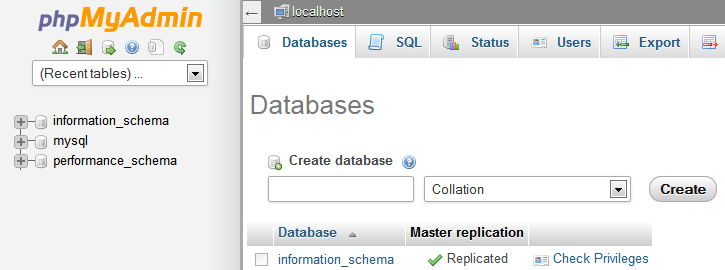
Creating a database can be done using any database administration tool. We will be using the free phpMyAdmin tool (http://www.phpmyadmin.net/), which should come pre-installed on most web hosting.
Connect to phpMyAdmin using your account credentials, which your host provided you with. It should be accessible through a standard URL, tied to your domain name, or host’s domain name.
In the left column, you can see the databases currently available on your MySQL server. Some of them should be left alone, because they are either used by phpMyAdmin or by the host: phpmyadmin, mysql, information_schema, performance_schema and others. Read your host’s documentation to know if one of these can be used as a default database.
Either way, you can create a brand new database by going in the “Database” tab and using the central form named “Create new database”. Simply enter a unique name, and click “Create”. The name of the database will be added to the list on the left. You can now use it to store PrestaShop’s data.
Launching the auto-installer
Now comes the part where it all comes together: installing PrestaShop.
The installation process is quite easy, as it is streamlined with PrestaShop’s auto-installer. You will be able to browse through it in handful of minutes. Do read each page thoroughly so that you do not miss any information.
To launch the installer, simply browse to PrestaShop’s location on your web server: the script will automatically detect that PrestaShop is not yet installed, and will take you to the auto-installer.
You can also directly type the address of the /install folder: http://www.example.com/prestashop_folder/install.
From there on, you just have to read, click, and fill a few forms.
There are 6 steps. At the top of the page, the installation assistant gives you a visualization of where you are in the process: the gray faces turn into smiling faces after each step that is completed.
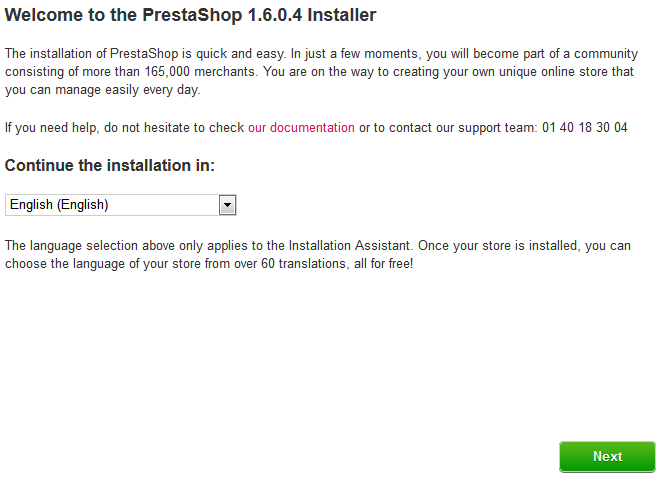
Step 1: Welcome page
This page is a quick intro of the installation process. You can choose the language in which the installer will display its instructions.
Select the language in which you wish the installer to be, then click the “Next” button. This will also set the default language for your PrestaShop installation – but other languages will also be available for you to enable.
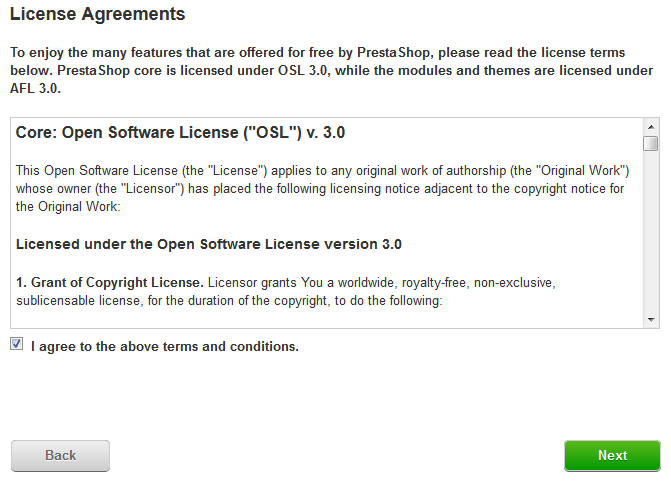
Step 2: PrestaShop’s licenses
This second page is a simple requirement: PrestaShop is free and distributed under a certain set of open-source licenses. You simply cannot use this software if you disagree with the terms of the licenses, and this step requires you to explicitly acknowledge them.
You must agree to both licenses (Open Software License 3.0 for PrestaShop itself and Academic Free License 3.0 for the modules and themes) in order to install PrestaShop.
To access the next step, you must check the “I agree to the above terms and conditions” box, then click “Next”. If you do not explicitly agree to the licenses, you cannot install PrestaShop: the “Next” button will not even be clickable.
Step 3 & 4: System compatibility & Store information
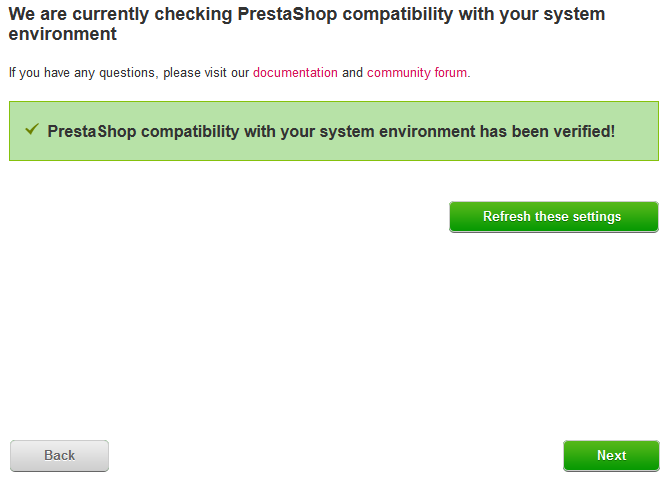
The third page makes a quick check of all the server parameters on your host. In most cases, you will not see this page, because if nothing wrong is found, you are taken directly to the fourth page, “Store information”. If so, you can still go have a look at the third page by clicking on the “System compatibility” link in the left sidebar.
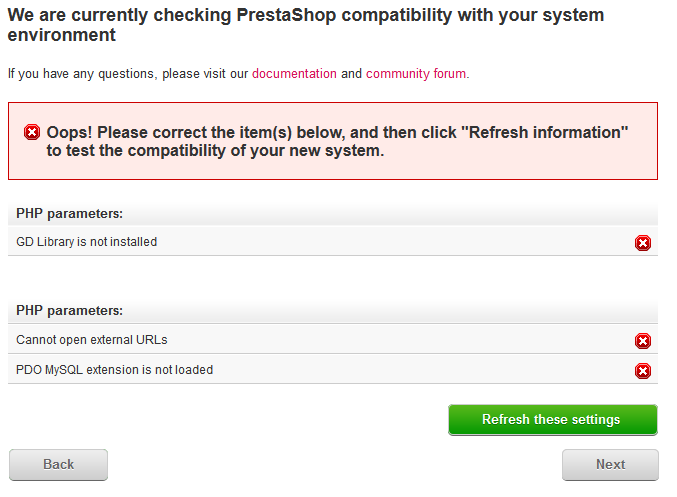
If something does go wrong during the server check that happens in the third step, the installer displays the “System compatibility” page, where you can see all the checks that failed.
System compatibility
This page checks that everything is OK with your server configuration: PHP settings, permissions on files and folders, third-party tools, etc.
If anything goes wrong, the installer stops you here, enabling you to see the few technical details that need fixing, be it changing the PHP configuration or updating the file permissions.
Major errors that come during this step are because of file/folder permission on your server. Permissions are the way a filesystem grants access rights to specific users or user groups, controlling their ability to view or make changes to files and folders. The installer needs to make several changes to the files that you uploaded, and if the filesystem does not allow for these changes through proper permissions, then the installer cannot complete its process.
Hence, if the installer shows that some files or folders do not have proper permission, you have to changer these permissions yourself. This will require you to access your files on your web server, and therefore use your FTP client (such as FileZilla) or the command line.
Log-in to your server account using your FTP client, browse to PrestaShop’s folder, and find the folders that are marked by the installer as in need of a permission change.
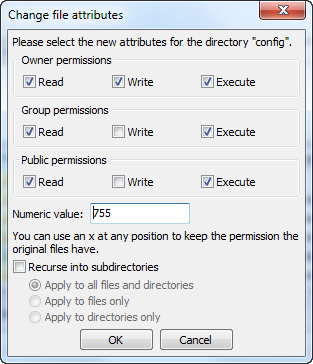
Thanks to FileZilla (and most FTP clients), you do not have to use any Unix command. Most FTP clients make it possible to change permissions easily and graphically: once you have found a file or folder that needs such a change, right-click on it, and in the context menu choose “File permissions…”. It will open a small window.
Some folders might need to have all their files and sub-folders change permissions too. In that case, check the “Recurse into subdirectories” box.
While changing permissions in your FTP client, you should regularly check that you have made the correct changes by running the installer’s compatibility checks again: click the installer’s “Refresh these settings” button as often as necessary.
Once all indicators are green, you can click “Next”. If you cannot have them all green, at least make sure the installer displays the “PrestaShop compatibility with your system environment has been verified!” message at the top of the page.
System Information
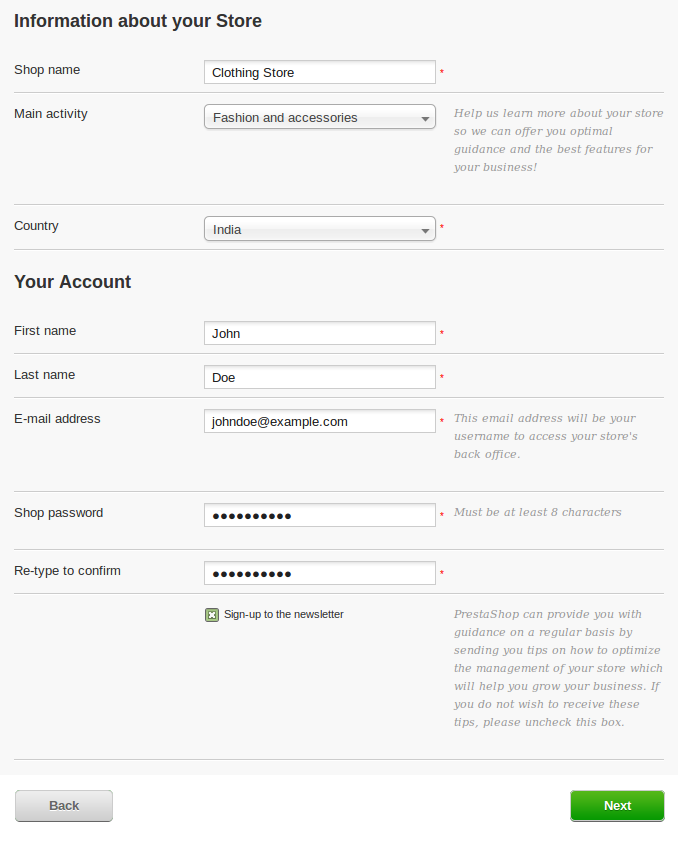
This is where you can start customizing your shop: give it a name and a logo, indicate its main activity, and indicate the personal information for the shop owner (which has legal binding in most countries).
Click “Next” to continue.
Step 5: System configuration
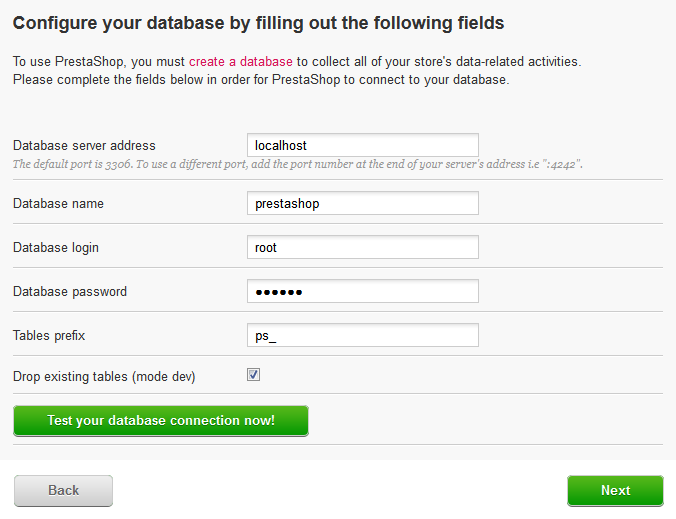
This page contains a form that enables you to tell PrestaShop where the database server is, and which database it should use, along with a few other details. All this information should have been provided to you by your web host.
Fill all the fields with the database connection information provided by your web-host:
Database Server Address:
The hostname of your MySQL server. It can be tied to your domain name (i.e. http://sql.example.com), tied to your web host (i.e.http://mysql2.alwaysdata.com), or simply be an IP address (i.e. 46.105.78.185).
Database Name:
The name of the database where you want PrestaShop to store its data. This is either an existing database on your MySQL server, or the one that you created using phpMyAdmin (or any other SQL tool) in the “Creating a database for your shop” section of this guide.
Database Login:
The name of the MySQL user that has access to your database.
Database Password:
The password of the MySQL user.
Database Engine:
The database engine is the core of your database server. InnoDB is the default one and you should use it, but the more technical among you might want to choose another engine. Generally, there is no need to change the default setting.
Tables Prefix:
The prefix for your database tables. “ps_” is the default, resulting in the PrestaShop SQL tables having names such as “ps_cart” or “ps_wishlist”; but if you need to install more than one instance of PrestaShop on the same database, then you must use a different prefix for each installation. However, we do recommend that you create one database per installation of PrestaShop, if your web host allows it. Better yet: make one installation of PrestaShop, and enable the multistore feature in order to manage many stores from the same PrestaShop back-end.
Drop Existing Tables:
This is only available in “Dev mode”. When re-installing PrestaShop, you can choose to drop the existing PrestaShop database tables in order to start on a clean slate.
Click the “Test your database connection now!” button in order to check that you did use the correct server information.
Click “Next”: the install will start configuring your shop, creating and populating the database tables, etc. This might take a few minutes: please be patient and do not touch your browser!

The installer does the following:
- Create the settings.inc.php file, and fill it with your settings.
- Create the database tables.
- Create the default shop with its default languages.
- Populate the database tables.
- Configure the shop’s information.
- Install the default modules.
- Install the demonstration data (products, categories, user, CMS pages, etc.).
- Install the theme.
Once it is done, your shop is installed and ready to be configured!
Completing the installation
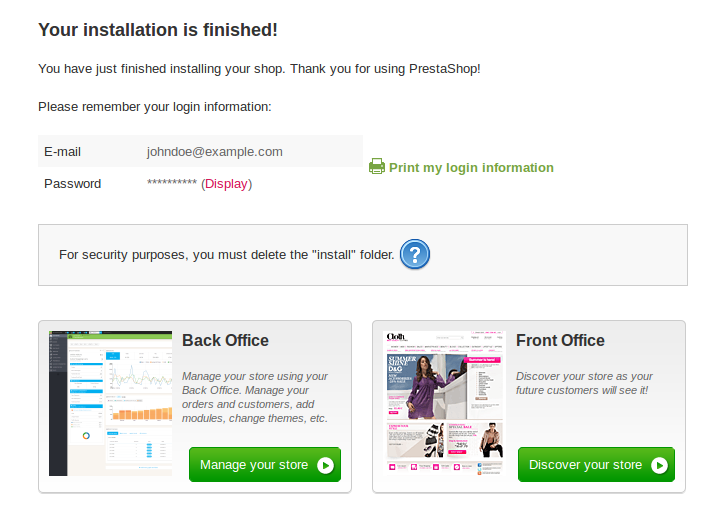
As you can read right on the final page of the installation process, there are a couple of last actions to perform before you can leave the installer.
An easy way to improve your installation’s security is to delete some key files and folders. This is done using your FTP client, directly on the server. The items to delete are:
- The “/install” folder (imperative).
- The “/docs” folder (optional), unless you need to test the import tool with the sample import files that this folder contains.
- The “README.md” file (optional).
Click on the “Manage your store” button in order to be taken to your administration area.
Finally, in order to close all potentially malicious doors, use your FTP client to update the files and folders permissions to 664, or 666 if your host requires it. If it turns out low access rights prevent some modules to work, you should set permissions back to 755.
Congratulations! Installation is fully completed now.
Introduction

